Operations mode in Delta Force—also known as Hazard Operations or Extraction mode—is where the game’s most intense, high-stakes action unfolds. Whether you refer to it as Operations or simply “raiding,” the core objective remains consistent: drop into the map, gather valuable gear, and extract safely before rival players or AI enemies eliminate you. The key twist? Everything you carry is at risk—if you fall in battle, you lose it all.
This guide dives deeper than just basic survival strategies. Here, you’ll gain a comprehensive understanding of how Operation mode functions from start to finish, including how to pace your run, manage your inventory, and make calculated decisions that accumulate value over time. If you're specifically looking for survival tips, we’ve covered those in a separate article on our blog.
Whether you're playing solo or with a squad, mastering the system gives you a significant edge in every match.
What Operations Mode Actually Is
Delta Force's Operations mode is a dynamic PvPvE sandbox where no two matches ever feel the same. You and up to two teammates enter a living map filled with AI soldiers, scattered loot, and competing squads. Your mission? Gather valuable items and successfully extract before being taken down.
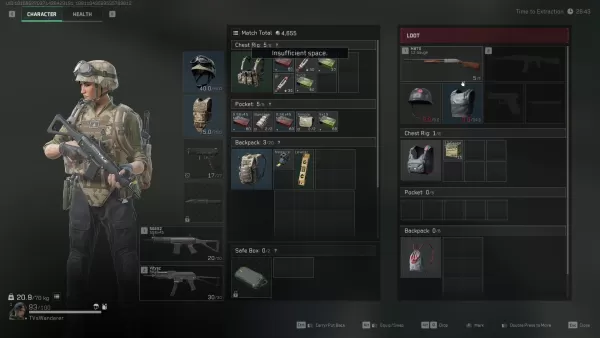
Unlike traditional shooter modes, there's no score to track. Instead, what you bring out becomes part of your persistent inventory outside the raid. Conversely, dying means losing everything you’re carrying—except for the limited items stored securely in your Safe Box. This risk-versus-reward structure is what makes Operation mode so thrilling—even if you're only extracting with a few medkits and some attachments.
Loadout Planning and Inventory Control
Your success begins long before touching down on the map—it starts with crafting an effective loadout. Every match costs resources to enter, so optimizing your selection is crucial. Essentials like helmet, armor, chest rig, and backpack are mandatory—you can’t deploy without them. Beyond that, your additional choices shape how you engage with the world.

While extraction zones are typically fixed, certain maps introduce variables such as elevators or enemy-controlled chokepoints. Always know your exit route before committing to deep looting.
Loot Smarter, Not Harder
Each item in Operations carries a sellable value, but not all are worth the risk. In the early stages of a run, prioritize healing supplies, weapon attachments, and rare electronics—they’re compact, valuable, and easy to store in your Safe Box when needed.
Heavy weapons and bulky armor may look appealing, but they reduce mobility and consume precious inventory space. Only carry these if you're confident in your ability to extract or if you're near your extraction point with nothing left to lose.
A smart beginner strategy is to avoid major loot hubs during the first few minutes. Let other teams clash and clear out, then return afterward to collect what’s been left behind. Solo players should focus on the outer edges of the map initially and circle back later. Often, plenty of high-value items remain after chaotic engagements.
Picking the Right Operative
Choosing the right Operative significantly influences your playstyle in Operations. Not every character suits stealthy or loot-focused gameplay, so select one that aligns with your objectives.
Luna and Hackclaw are top-tier picks for intelligence gathering and mobility. Luna’s shock arrows allow her to tag enemies and disrupt incoming pushes, while Hackclaw excels in silent movement and knife takedowns. Stinger, with his healing kit, is ideal for team-based operations, especially when supporting more aggressive teammates.
Avoid Operatives with loud or flashy abilities unless your plan involves direct combat. Characters like D-Wolf offer fun mechanics but tend to draw too much attention in a mode where staying unseen often leads to better outcomes.
Fight When It Matters
In Operations, choosing when to engage matters more than winning every firefight. While eliminating enemy players grants gear and XP, it also slows your progress and draws additional threats. Only initiate combat when necessary or when it offers the best tactical advantage.
If a firefight breaks out, constantly reposition and aim to resolve it quickly. Use special abilities strategically—Luna’s detection arrow can reveal opponents hiding behind cover, and Stinger’s smoke can provide cover for healing or retreating.
Also keep in mind: you can always loot fallen enemies later. If two squads are locked in combat, hold back and let them weaken each other. Third-partying is inherently risky, but it’s one of the most efficient ways to acquire gear without needing to outshoot everyone directly.
Making the Most of Each Match
Every operation presents an opportunity to build value, refine skills, and discover new tactics. Don’t be discouraged by a failed run—use it to adapt and improve your approach for the next one.
Manage your credits wisely during losing streaks and play aggressively when on a roll. Upgrade your Safe Box as soon as possible, experiment with different Operative builds, and explore the maps to identify optimal loot routes.
Eventually, you'll shift from merely surviving to actively optimizing your performance. That’s when Operations mode truly shines.
Delta Force's Operations mode isn't just about looting and escaping—it's a strategic test of risk management, preparation, and decision-making. Build your loadout intentionally, loot efficiently, and know when to fight or retreat. And remember, every setback is part of the learning curve that makes your eventual big win even sweeter.
For the smoothest and most responsive experience, consider playing Delta Force on PC using BlueStacks. Enjoy faster load times, improved control precision, and easier inventory management. It’s the ideal setup for mastering the game while climbing the skill ladder.
 Home
Home  Navigation


 Latest Articles


 Latest Games


